In JibberJobber there are many pages that we call “List Panels.” List Panels are kind of like Excel, with columns and rows. You can do things on the List Panel, such as filter your search to only show you hiring managers in a certain city, or see a list (and get email addresses) of all of your family or friends. You can do more things, but I want to focus on one: how to change the data that shows up on your List Panel.
First, to get to a List Panel, you can click on any of these menu headings. Note there are other ways to get there, but this is the main way I get there:
Next, directly above the List Panel, find the Manage Columns icon, which will be on the left of the filtered search box (note in this image, I’m filtering my List Panel results to anyone I’ve tagged as a recruiter):
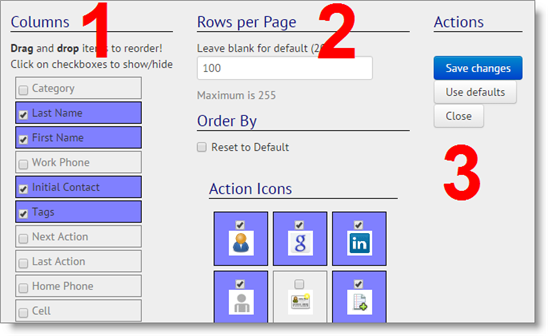
Click on that and you see three columns:
Column 1 allows you to turn on or off columns, and reorder them (by clicking and dragging to the new position)
Column 2 allows you to show more (or less) than the default of 20 rows per page (and you can do a couple of other things, which I rarely change).
Column 3 allows you to save the changes, or reset your entire List Panel to the defaults.
What you do here will be saved so the next time you come into JibberJobber you don’t have to do it again. You can change your preferences as often as you want.
Pretty cool, huh?


1 thought on “How To: Manage Columns on the JibberJobber List Panels”
Comments are closed.