Congratulations, with your new JibberJobber account you are on the path to better career management!
Let’s go through a few things that will help you get value from JibberJobber, which was designed to help you organize and manage your job search and your networking. JibberJobber is a tool to help you manage your career, and has helped many people expedite their job search.
JibberJobber was designed to help you keep track of the most important things in your job search: your network relationships, target companies, job opportunities, and any communication you have around each of those. Managing and organizing your job search and networking can get really complex, especially when you think about follow-up with each person you communicate with.
This guide will take you through a sequence of events that should help you master JibberJobber. At first it might look like a lot to figure out, but as you learn and use this tool, you’ll feel more comfortable with it. More importantly, you should miss fewer networking and follow-up opportunities, and feel more prepared to have the right conversations with people at your target companies.
First, let’s add a networking contact.
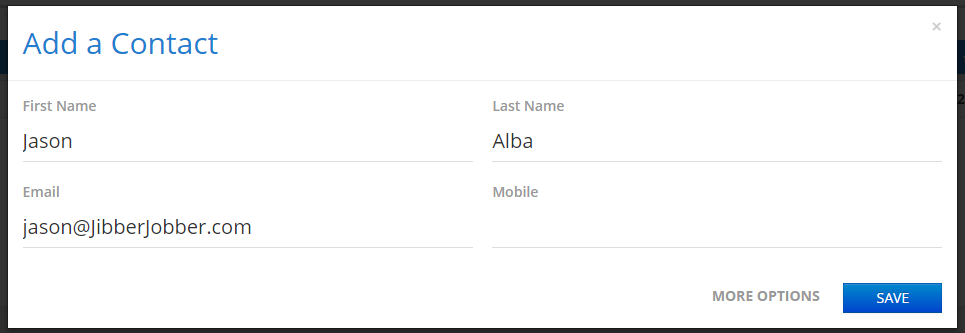
Let’s say you meet someone at a networking event. You know his name is Jason Alba, and his email is Jason@JibberJobber.com.
There are a few ways you can enter the new contact information. For now, login to JibberJobber and click on the Add Contact button in the menu:
You will see a simple form where you can add the name, email and mobile number for this new contact. If you click “MORE OPTIONS” you’ll see more fields, such as address and location, but let’s just put in the three data points we know:
Click save and you now have a contact in JibberJobber! That was easy, right?
Many times I’ll add a contact without having all of the information I want. Eventually I get more information and put it in when I think it’s important. For example, I don’t have Jason’s mobile number now, but maybe once he emails me I’ll see it in his email signature (along with his title, company, and maybe even address).
Next, let’s add a log entry.
As I usually do with my contacts, I send Jason a follow-up email. Here’s where the value of JibberJobber really kicks in! I want to record relevant conversations I have with my contacts in JibberJobber, and this follow-up email certainly qualifies as a relevant conversation.
I could take the following laborious steps: send the email to Jason, then go to my sent box and copy the subject and body, then go back into JibberJobber, find Jason’s record, create a log entry, and paste the subject and body of the email into the log entry. I have actually done that hundreds of times… but now we have something better. Way better. Here’s what you do (note: this is a premium feature):
- Set up Email2Log (this is a one-time thing)
- When you write any email, include your Ultra Secretive Email2Log Email Address in the BCC field (this takes about a half of a second once you get the hang of it)
That’s it! It’s that easy… and very, very powerful.
When I send Jason a follow-up, with my Email2Log address in the BCC field, the email goes to Jason and the JibberJobber server. When it reaches us we check to make sure you have a premium account. Then we see if Jason is one of your contacts. In this case he is, so we simply take the email and make a log entry under his record. No more copy paste, etc. What used to take a minute or two per email now takes less than a second!
It gets better… let’s say Jason’s record didn’t exist in your JibberJobber account. If we don’t find his record, we simply create a new contact record and make the log entry under that new contact.
Here’s another scenario to show why this is so cool: Let’s say you meet Kimberly at a networking event and you exchange business card. You could manually add her in JibberJobber, like you did above with Jason’s record. But you don’t want to take the time to do that, so you simply email her a “nice to meet you” follow-up email. You put your Ultra Secretive Email2Log Email Address in the BCC field, send the email to Kimberly, and you are done! Within a minute or two you’ll have a new contact record for Kimberly and the email will become a log entry!
This is a great time saver. Imagine if you send 10 or 20 emails in one day. Keeping tracking of all of that in JibberJobber just adds more to your plate… taking time you don’t really have. But using Email2Log makes adding all of those contacts and log entries fast and easy!
You can see how powerful Email2Log is. It can do much more than I described in this example. Check out the Email2Log Getting Started videos to see what else you can do.
Next, add a target company.
Let’s say things with Kimberly work out, and she tells you about an opening on her team. From her business card you can find all the information you need to add her company and even department into JibberJobber. There are a few ways you could get the target company into JibberJobber. Of course, you could use the Add Company button that is next to the Add Contact button that you used at the beginning of this scenario. You could also do it by using Email2Log. For this example, though, let’s do it a different way.
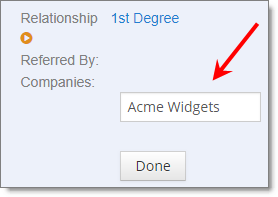
Find Kimberly’s record that you created and double click in the area where you should see her company (when you mouse over it, the box turns gray, which means you can double-click to edit it). Then, simply add the company, Acme Widgets. Save, and that’s it. Ta-dah! You now have a target company in JibberJobber!
You stay on Kimberly’s page the whole time, but you can now switch over to the Acme Widgets page by clicking the company name.
The target company is a record where you can store stuff like phone numbers, addresses, and tags. You can associate contacts (Kimberly will already be associated, since you created the record from her page) and jobs. It’s the one place to see what’s going on with that company. You can also create log entries there, so you can easily see what communication you’ve had with anyone at that company.
Now, let’s add a job you are tracking.
Kimberly gave your resume to her boss, and recommended you for the open position on their team. In JibberJobber you have her contact record and the target company, but not the opening. By now you know you can add the job a few different ways. Do you want to add it with the Add Job button at the top of every page? Do you want to add the job with Email2Log? Or do you want to add the job by going to Kimberly’s or Acme’s detail page, and double-click on the Job box (the one that turns gray when you mouse over it) and add it from there? There is no wrong way to do it.
Let’s add this job by clicking the Add Job button at the top of any page. All you need to add is the job title, and click save.
The confirmation message has a link to go to the job detail page, where you can add more information and even associate it with the target company, Kimberly’s contact record, and even Kimberly’s boss’s record. You can also paste the job description into the job detail page, which could come in handy later (in case they take the job posting off the internet, but you still have an interview with them!).
As with contacts and companies, you can add log entries on the job record. Every job has what we call events. Sending a resume in (or applying online) is an event. Interviewing and sending thank you letters are also events. As you create log entries you can designate those as events, and then track the progress of each job by how many events you have completed.
Finally, let’s create reminders (or what we call action items).
A tracking system that just captures data is one thing, but what if the information you track could prompt you to follow-up on something? That’s one of the reasons you should use JibberJobber now, and for the rest of your career.
Let’s say that you had an interview with Kimberly and her boss. You send a follow-up or thank you email to them, and of course you BCC your Email2Log email address. You now know how to do each of these things. In addition to logging the email, you want to follow-up in a week.
Of course, there is more than one way to create a reminder. You could add a special, or “reserved” line in the follow-up email you send, but let’s do it the long way so you can see what’s happening in JibberJobber.
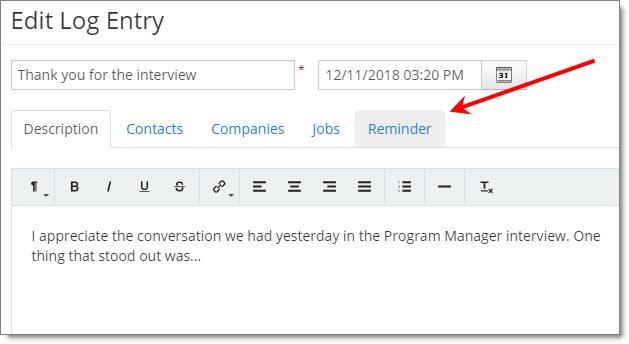
You can do this at any point in the log entry creation process. Simply start a new log entry, or open an existing log entry, and eventually click the Reminder tab:
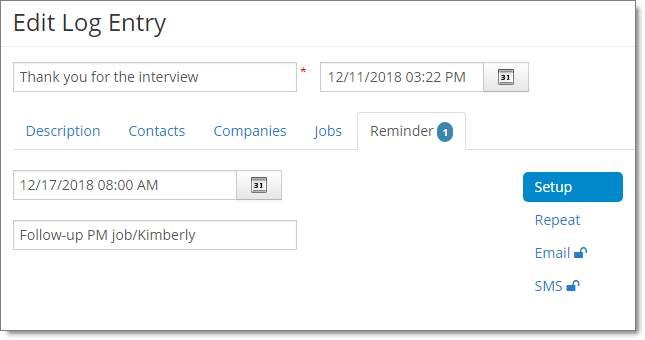
Once you click the Reminder tab you can choose a follow-up date and an alternative reminder title (which will usually be more actionable than the log entry title).
You can save the log entry (and reminder) at this point, and you are done! You can also click on any of the links on the right, to create a recurring reminder, or to change your email or sms reminders.
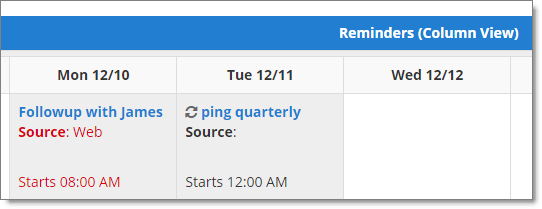
You’ll see these reminders in various places. If you are showing the calendar or reminder widget on the front page, you’ll see them there. You’ll see them in the appropriate record’s detail page (where the log entries are), and as a premium user you can get reminders in your email and with some cell providers in your text messages. We want you to act on your information in a way that helps you stay on top of things!
Let’s wrap this up.
There is more to do with JibberJobber, and I hope you are pleasantly surprised each time you find new features and tools. At this point you can do all of the important things:
- You can add a contact, company, or job record.
- You can create log entries on any of those records.
- You can use Email2Log, saving you gobs of time.
- You can create reminders to help you with your follow-up.
If you have any ideas on what you’d like to see, please let us know. We’ve been at this for over a decade, and we know we have plenty of work left to do. If you get stuck on anything, please reach out for help.
Good luck as you work towards your next dream job!


