Following up on yesterday’s important post on how to import Contacts from other systems, today I want to dig deeper into the Advanced Contact Import page. I think this is everything you need to know about this page. It’s really quite simple… reading through this should take longer than actually doing this step of the import.
In this example, I’m using a CSV file I created. Here are my steps, from start to finish. Let’s say I went to lunch with John and Jane, and I have their business cards… when I get back to my office I would:
Step 1: open Excel, add the information:
Note the fields. The first, second and third are easy. I made up four “custom fields,” or user defined fields, that are not in JibberJobber, but I want to track this information. I ALWAYS RECOMMEND ADDING CUSTOM INFORMATION (AKA, CUSTOM FIELDS) IN THIS CSV BEFORE YOU IMPORT TO JIBBERJOBBER. It’s easier to do add this information here than it is one-at-a-time after the records are created.
Step 2: Save it as a csv file:
You have to click SAVE AS, and then in the file type drop down, choose the csv option. This is critical! (the final name will be jj_import_oct2012.csv)
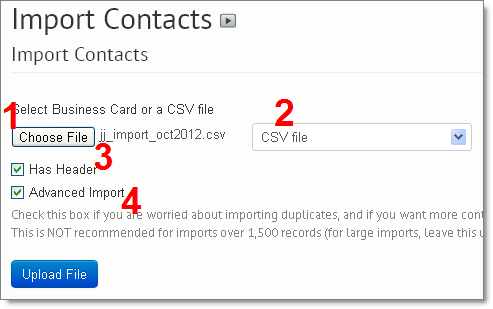
Step 3: Import into JibberJobber. I get to this page by mousing over the Network menu option, then clicking on Import/Export.
- Choose file… this browses my C: drive…
- I leave this as CSV file, but there are other options.
- I always have a header, so I click this checkbox.
- I like the Advanced Import because I can make sure the fields are mapped correctly. This morning I imported 12,000 records and it went quick and smooth (there were only 4 fields per record… if you have more, it might take a while to load the next page).
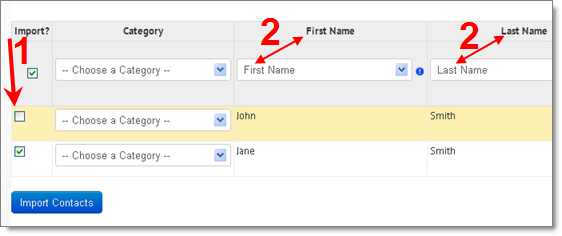
Step 4: See what is NOT being imported, and make sure fields are mapped correctly.
- The checkboxes on the left show if a record is going to be imported or not. You can see the first checkbox is NOT checked (and the color of the row is that yellowish color). This means the system thinks this would be a duplicate, and we are NOT going to import it. If you want to force the import simply click the checkbox.
- Next, notice that each field is properly mapped. The top bold line is what your header is in your CSV file, the drop down is what we think it should be mapped to. Make sure all of these are mapped. If there is a column that isn’t mapped, it will have a yellowish background and something else in the dropdown (see next step).
Step 5: Create Custom Fields in bulk!!
Now we get to the FUN part! What about those weird four fields that don’t correspond to anything? Here’s how it works… following the numbers from above:
- You can see we didn’t recognize “Email Address” so the drop down says “Choose One” and is not white. Simply click the drop down and find “Email” to map it to the right field.
- Wedding Anniversary is actually a custom field I already had in the system… so it recognized that and allowed me to choose it.
- Contract Start Date was NOT in my custom fields, so in the drop down I chose CUSTOM FIELD, and then a new drop down showed up where I could choose an existing custom field, or create a new one. I chose OTHER, so I could create a new Custom Field… and then this popup came up where I could enter the new Custom Field. This is AWESOME, since before you would have had to take a bunch of steps to create a Custom Field. Now it’s this easy to do it in bulk.
Step 6: One more click to finalize the import!
When it looks good, simply scroll to the bottom, on the left, and click “Import Contacts.”
That’s it!
Remember, instructions on exporting and importing from other systems (specifically LinkedIn) are on yesterday’s post.


